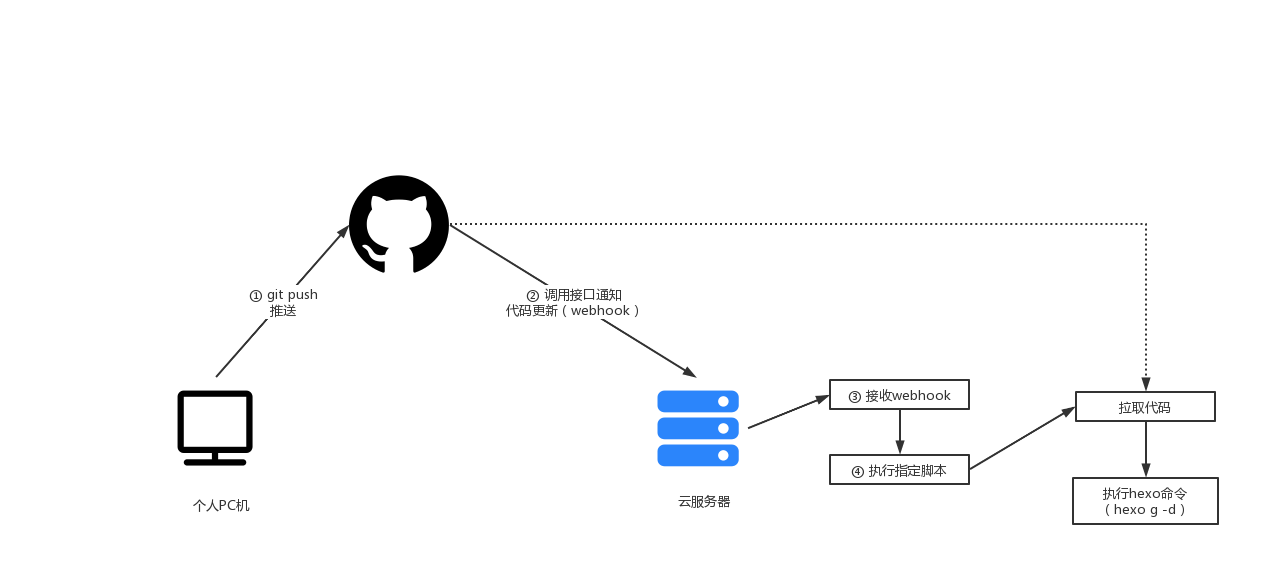
整体流程图

分步骤
git push推送
此处略去
调用接口通知
此部分为最核心的部分内容,主要分为两块内容
- 在服务器上启动server,接收来自github更新时候的调用(即webhook)
- 配置github上的webhook
启动server
- 创建文件夹,进入文件夹执行操作
npm init -y // 初始化
npm i github-webhook-handler // 安装 github webhook监听工具
- 在文件夹中新建文件
gitupdate.js
- 替换password,同时记录下来,在github上配置github会使用到
- 修改deploy.sh为接收push时会执行的具体脚本
var http = require('http')
var createHandler = require('github-webhook-handler')
// secret:填写 github 配置的密码  path设置成 / 即可
var handler = createHandler({ path: '/', secret: 'password' })

function run_cmd(cmd, args, callback) {
  var spawn = require('child_process').spawn;
  var child = spawn(cmd, args);
  var resp = "";

  child.stdout.on('data', function(buffer) { resp += buffer.toString(); });
  child.stdout.on('end', function() { callback (resp) });
}

http.createServer(function (req, res) {
  handler(req, res, function (err) {
    // 断开请求
    console.log('请求过来了,不要走了!')
    res.statusCode = 404
    res.end('no such location')
  })
}).listen(4000,function(){
  console.log((new Date()) + '我启动起来了', 4000);
})

handler.on('error', function (err) {
  console.error('Error:', err.message)
})

handler.on('push', function (event) {
  console.log('Received a push event for %s to %s',
    event.payload.repository.name,
    event.payload.ref)
    // 监听到 push 执行 sh 文件夹
    run_cmd('sh', ['/etc/cron.daily/hexoUpdate.sh',event.payload.repository.name], function(text){ console.log(text) });
})

handler.on('issues', function (event) {
  console.log('Received an issue event for %s action=%s: #%d %s',
    event.payload.repository.name,
    event.payload.action,
    event.payload.issue.number,
    event.payload.issue.title)
})
- 使用pm2来启动脚本
pm2 start gitupdate.js --name hexoUpdate
启动之后通过telnet localhost port或在本地上telnet ip port 验证是否创建成功
其他命令
pm2 list   # 查看pm2启动进程情况及id
pm2 logs  ${id}   # 查看执行进程的执行日志
pm2 stop ${id}   #关闭进程
node gitupdate.js   #直接启动命令
配置github
进入代码仓库—settings—-Webhooks,添加
- Payload URL:http://ip:port/, 其中ip为云服务器的ip,port为上一步启动时的指定端口,注意由于上一步我们的
gitupdate.js文件中的path指定为/,故此处不需要额外的path路径了 - Content type:修改为application/json
- Secret:上一步的password
接收webhook&执行指定脚本
完成上面两步我们就可以实现往代码仓库推送代码之后,触发服务器上执行指定脚本的目的了,可以在代码仓库---settings----Webhooks--详情---Recent Deliveries 中查看推送记录。
参考